Temperature station on a Raspberry Pi
04 Mar 2015
To begin with, I did a clean install of Raspbian based on Debian Wheezy. I’m running it without a graphical user interface, no overclocking but I have reduced the GPU memory to 16 megabytes.
Hardware
I won’t describe how the sensors are put together because there are so many good guides already. I would recommend this guide from adafruit which I followed myself. I used two waterproof DS18B20 sensors connected in parallel with one 4.7kΩ resistor.
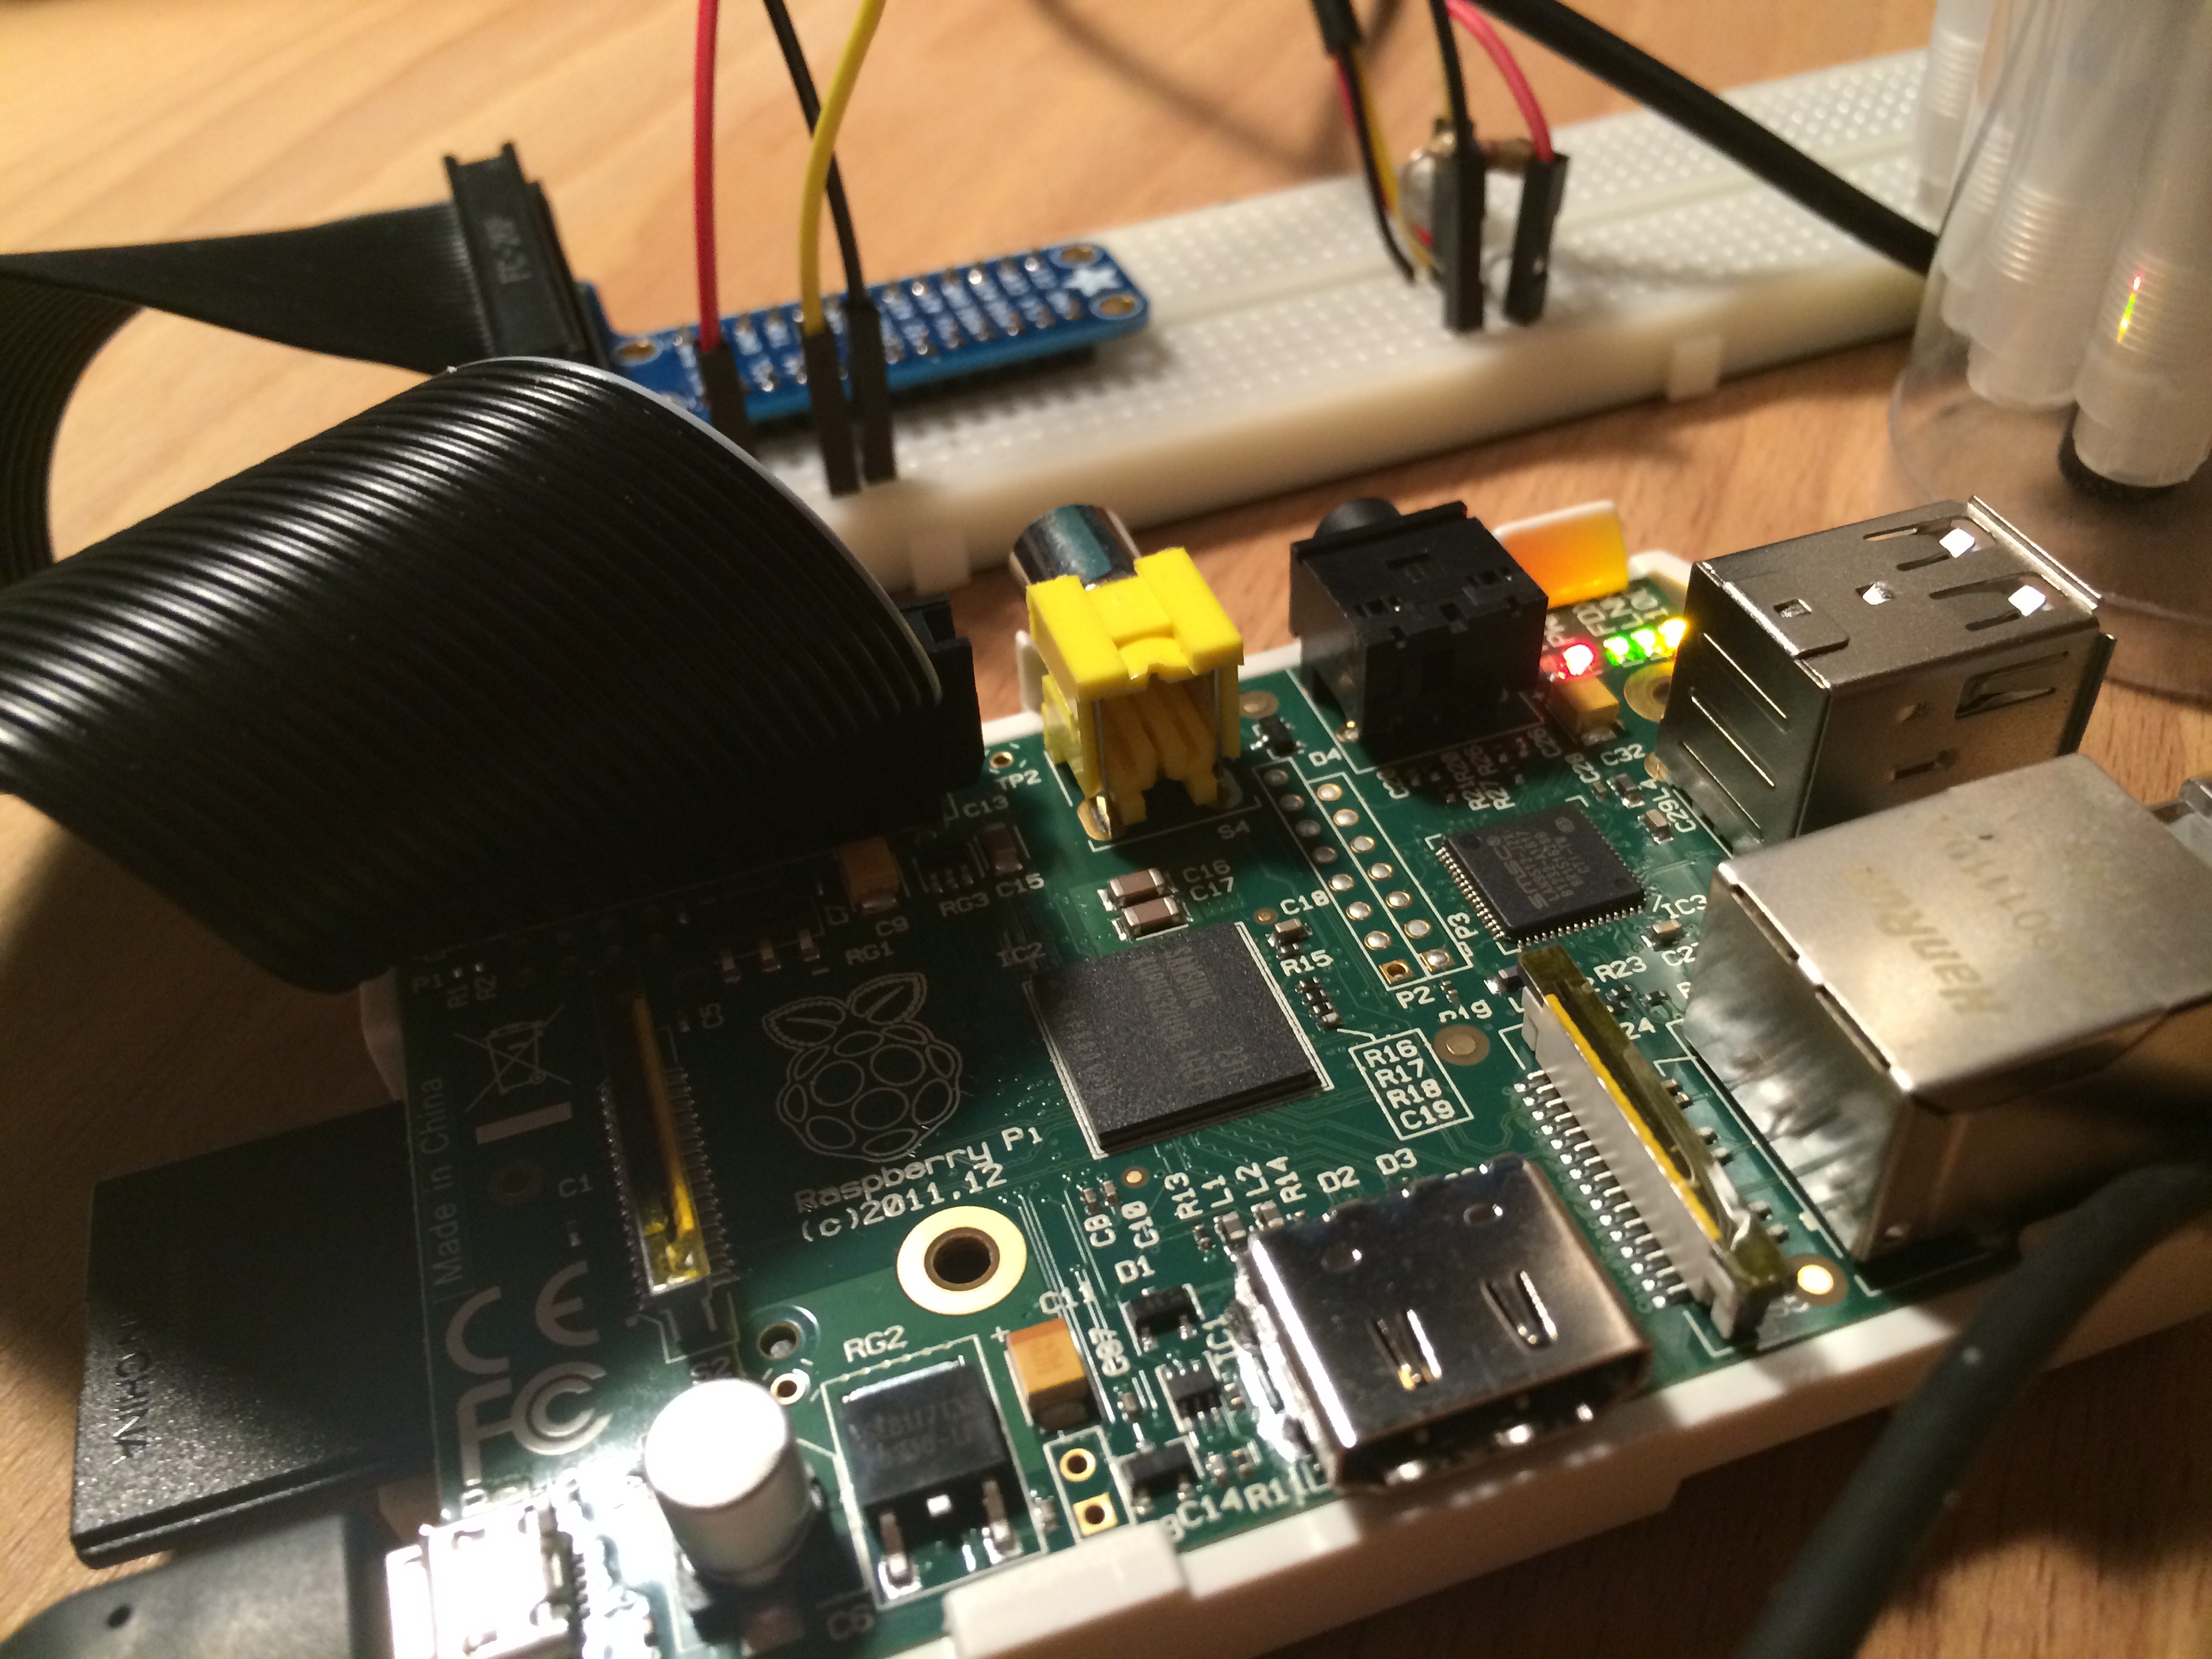
Note that there is one change (not present in the guide linked above) which has to be made in Raspbian in order to read the sensor data which I’ll describe below.
Reading the sensors
It seems like there has been a change in Raspbian lately which requires a minor change before the sensors can be read. If you’ve followed the guide I linked above from adafruit, then you want to add the following line to the file /boot/config.txt:
dtoverlay=w1-gpio-pullup,gpiopin=x,pullup=y
You can read more on the Raspberry Pi forum about what these settings actually mean and how they can be changed based on whether you have a pull-up pin and so on.
Now you should reboot Raspbian. After that, you should look in the path /sys/bus/w1/devices.
pi@raspberrypi ~ $ ls /sys/bus/w1/devices/
28-0114651de1ff  28-0314564e82ff  w1_bus_master1
Everyone of your sensors will have its own folder starting with “28-“. As you can se above, I have two sensors. There is a file in each folder called w1_slave which you can read to see the actual sensor data.
pi@raspberrypi ~ $ cat /sys/bus/w1/devices/28-0314564e82ff/w1_slave
61 01 55 00 7f ff 0c 10 6a : crc=6a YES
61 01 55 00 7f ff 0c 10 6a t=22062
On the first line, you can see that it ends with “YES”, which indicates that we successfully got a value. On the second line, you’ll see “t=22062” from my example. This is the temperature in 1/1000 degrees celsius, so that would be 22.062 degrees celsius.
Note that the precision isn’t actually that accurate. The sensors I bought are only precise to ±0.5 degrees even though they look a lot more precis from the read-out.
Let’s go temp_log!
Alright, now we’re ready to get down to the software. We’re going to use a piece software I wrote called temp_log. It is written in Elixir and it will read all your sensors, store the result in a database, provide an HTTP API to query the results and a small visualisation with graphs.
So, first you have to install Elixir on Raspbian. You can use my previously written guide to do that.
After that is done, you need to install git and postgresql.
sudo apt-get install git postgresql
Git will be used to clone temp_log from GitHub and postgresql is the database which we’ll use.
Prepare the database
Now we’re ready to setup the database. First we need to use the client psql to add a user and create the database. Use the following command to start the psql with the user postgres:
sudo -u postgres psql
Now we should create the user and the database. I’ve used “temp_log” as the username, password and database name. Change them to whatever you want!
CREATE USER temp_log WITH PASSWORD 'temp_log';
CREATE DATABASE temp_log OWNER temp_log;
To quit psql:
\q
Setup temp_log
First we need to get the temp_log source code:
git clone https://github.com/AntonFagerberg/temp_log.git
The first thing we should edit is the file config/config.exs and set the values we used in the previous step when we created the database. When this is done, we can migrate the database. It is important that the code for reading from the sensors won’t be started when we do this so make sure that TempLog.Reader is commented out in the file lib/main.ex:
children = [
  worker(Repo, []),
  #worker(TempLog.Reader, []),
  worker(TempLog.HTTP, [])
]
If it’s commented out as above, go ahead and type the following commands:
mix deps.get
mix ecto.migrate -r Repo
This will fetch all required dependencies and migrate the database (create the appropriate tables).
When this is done, go ahead and remove the comment above to enable TempLog.Reader. We’re now ready to test the application. To start it in a interactive shell, type:
iex -S mix
You should now see messages stating that sensor data was saved to the database. A new record is saved in the database once every minute.
23:17:49.089 [debug] INSERT INTO "entry" ("sensor", "temperature", "timestamp") VALUES ($1, $2, $3) RETURNING "id" ["28-0114651de1ff", 2562, { {2015, 3, 5}, {23, 17, 49} }] (9.0ms)
The data stored consists of three fields: sensor name (28-…), temperature in 1/1000 degrees celsius and a timestamp.
Web interface & API
The application has a web interface but will also exposes a simple API. The file lib/api.ex is responsible for exposing the API end-points. It will also serve the simple web interface which calls the end-points and displays the results using chartjs.
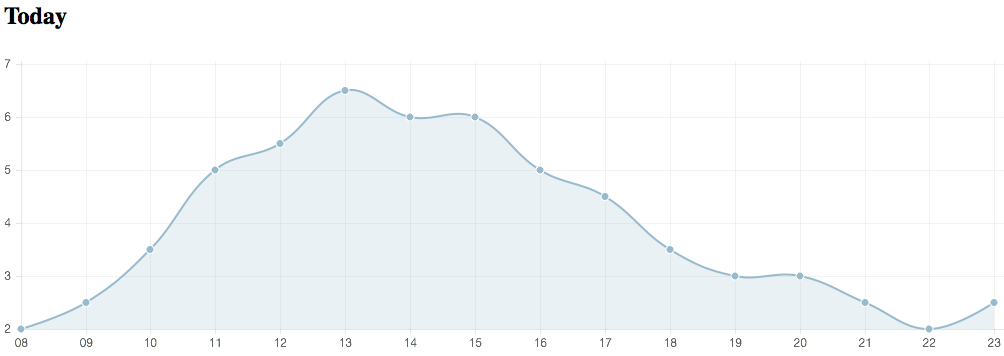
The application is running on port 4000 by default. (See below how to change it.)
Extending the API
You can extend the system and develop other end-points if you like. Take a look in lib/query.ex to see how the database is queried and how the results are collected. The project uses Ecto but I haven’t used its DSL in this project.
New end-points can be added in the file lib/api.ex. This file is also responsible for serving the template (html-file) stored in lib/templates/index.eex and the public files (main javascript & css) from the pub/ folder.
Settings
Sensor precision
My sensor has a precision of ±0.5 degrees celcius so that’s what I convert my sensory data to in the graphs. If you want to change this behaviour, you can open the file pub/main.js and change the following function:
function tempFormat(temps) {
  return temps.map(function (temp) {
    return (Math.round(2 * temp / 1000) / 2).toFixed(1);
  });
}
HTTP port
Per default, the HTTP server listens on port 4000. To change the port, open the file lib/http_worker.ex and change the init-function:
Plug.Adapters.Cowboy.http TempLog.API, [], port: 4000
Read interval
Per default, the application reads the temperature once every minute. To change this, modify the file lib/reader.ex and change the sleep timer:
:timer.sleep(60_000) # Sleep 1 min before reading the next value.
Fake data
You can fill the database with fake data if you want to develop another web-client. You can start populating the database with fake data from the iex shell by calling the method:
TempLog.FakeData.generate()